Tuesday, April 10, 2012

Hunger Games Mani


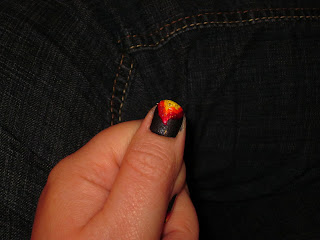
Taking a break from scrapping for right now.  I've been watching a lot of nail art videos on YouTube and stumbled on two very awesome designers.  Today I bring you a mani from one of them.  The mani is inspired by the book 'The Hunger Games.'  The title character is given a makeover and they paint her nails with flames (I'm completely shortening the storyline, I know).  The creater of this design is cute polish (who made the bunny mani I did for easter).  Until I figure out how to post videos, search her designs out on YouTube.

I used for this one Nail Polish: China Glaze Stone Cold (Hunger Games inspired color), Sinful White, Sunset, Morning Breath, and My Day.

Steps 1 & 2: Base Color Coat and Outline of Flame

Step 3, 4, & 5: Fill in white outline with My Day (red), Sunset (orange), and Morning Breath (Yellow).


Finished with a top coat. OH! For my thumb I added some glitter polish, just to accent the flame a bit. :)

Thanks for looking.... And may the odds be ever in your favor!

Sunday, April 8, 2012

Easter Craftiness

Just a quick posting of some easter crafting goodies.

First up, I found a neat idea on Pinterest with dying your cracked eggs.  It makes them looked marble-ly.  It adds to my awesomeness of my deviled eggs.  Can't wait.


Next up is this cute little mani I found on YouTube.  It's by cutepolish.  I made my ring finger a little chick to make things neat. :)


Have a Hoppy Easter!!!

Thanks for looking!!!

Monday, April 2, 2012


Angry Birds Birthday Invites and Thank You Cards


A coworker asked me if I could make Angry Birds invites for her daughters upcoming birthday party. Making no solid promise, I went onto Pinterest for some help. I found a site where a lady had free Angry Birds party decoration clip art. I focused on the birds for the girl and of course glitter. :) 
I hope she likes them.


Materials used:
Anger Birds Clip Art 
Core-danates Cardstock: Glitter (Apple Martini, Oscar, Red Carpet, Blue Diamond), Textured (Blue)
Computer paper
Paper Studio Patterned Paper from Hobby Lobby


Saturday, October 29, 2011

Clyde says, "Happy Halloween!"

I made this card for a friend of mine and it was too cute not to share. I got the image from Bg a Boo Stamps. They give out free digital stamps every friday. This likttle dragon guy, who's name is Clyde, was a freebie. To begin with talking about the card, I have to begin with Clyde. I actually colored him on the computer. I then printed out four copies of him so that I could create the layered effect. I cut out his body minus the horn and tail with one copy. And on another copy I just cut out his body. It gave him a very nice 3D effect.
The candy corn pattern paper was from Me and My Big Idea. I picked up the matstack a couple of years again, and the color scheme worked perfect with Clyde. The Green cardstock is from Provo Craft and the Halloween sentiment was from Studio G Clear Stamps. Thanks for looking. Have a safe and happy Halloween!!! Tammy

Saturday, January 16, 2010

Hello Kitty Swap (SCS)

Who doesn't love Hello Kitty?!? I joined another swap on Split Coast Stampers. I've gotten lots ideas from these swaps I've done. And when I saw a Hello Kitty swap, I just had to join. I broke out my Cricut Hello Kitty Cartridge and got work.

This one was just a simple one to throw together. I used plain black card-stock for the base of my ATC and using some Hello Kitty pattern paper for a second base layer. I think used a cut out from my Cricut Hello Kitty cartridge. I just used the HK Face and some patterned paper for her bow. To give her face a little "oomph" I used some glitter for her eye color. Then to finish it off I placed a HK sticker of her in a Halloween costume.


For this ATC I just had a little fun playing off the shape of the HK sticker set I found. I just some blue/green pattern paper for the background and plain white card-stock for the base. I used one of my favorite Thoreau quote and a scallop circle punch to go with the scallop edges of the HK stickers.


I am really loving this little ATCs I've been making. I've gotten some great layout ideas from a couple I've received. Stayed turn next week when I show off how I used an ATC layout on a birthday card for a friend.

Thanks for stopping by.
TTFN
T

Sunday, October 18, 2009

Preview of Swaps No. 3


This was an ATC I made for a swap on Splitcoaststamper's website. I would the stamp at Michael's in their dollar stamp bin. It was just too cute to pass up. I got the Martha Stewart Halloween Fence Punch to make the boarder on the bottom of the card. The background cardstock is a metallic black that just shines a lot better than the picture shows. For added spookyness I punched out a half moon with an one inch circle punch and added some green glitter glue to make it sparkle.

I just had too much fun with this swap. I have the recipe cards back from the first swap and I will post them as soon as I can.

Thanks for looking,
Have a great day.

TTFN
T

Monday, October 5, 2009

Swap-tastic #2

Here's a preview of yet another swap I joined. I know I said something about a fall ATC in the last post, but like the silly person I am I forgot to scan a picture of them. :) But I did make one for me to keep, so I'll show that one off later.

This time its a holiday card swap. This one was a swap challenge for me. It was an all white swap with choosing which holiday you wanted to do from Christmas, Hanukkah, or New Years. I signed up for two spots and did a Christmas Card and an New Years card. The New Year's one was a fun one to do.

Christmas Card:


I used two my cuttlebug embossing folders and white ribbon just to accent the contrast between the snowflake side of the card and placed the embossed square on the plain side. It makes just a simple christmas card. I did not put on a sentiment on it because I could not decided which to use, so I kinda left it up to whom ever gets the cards.


New Year's 2010:


I used one my favorite techniques on this card. I learned of the "waterfall" on another site and had to learn how to do it. As you pull on the ribbon, the card flips the numbers over to reveal the year "2010." I cut the numbers out on a shimmer paper to give it a little sparkle. The base of each square and the card itself is embossed with the cuttlebug folder "swiss dots" and I accented the star brads with some glitter glue. What a fun way to tell a family member "happy new year."


Thank you for looking again....
Stop by again for another peek at a really fun swap that I just could not say no to. :)
TTFN
T